

The Pure4Sure’s Watermarked RO-5ALK is a high-performance 5-stage under sink Reverse Osmosis water filtration system designed to deliver ultra-pure, healthy drinking water directly to your kitchen tap. Enhanced with an alkaline filter for pH balancing and mineral restoration.
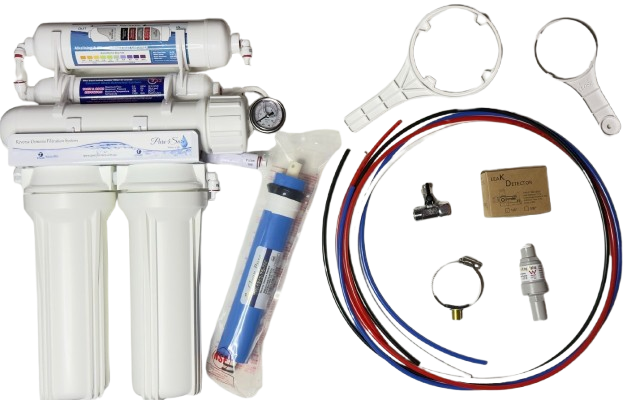
Pure4Sure 5-stage Under-Sink Reverse Osmosis system with Alkaliser.
Description
Key Features
Key Features
- 5-Stage Filtration Process:
-
Sediment Filter (5 micron) – Removes dirt, rust, and silt.
-
Granular Activated Carbon (GAC) – Reduces chlorine, taste, and odors.
-
RO Membrane (50–75 GPD) – Eliminates heavy metals, fluoride, nitrates, and other contaminants.
-
Post Carbon Block Filter – Further removes residual chlorine and organic contaminants.
-
Alkaline & Mineral Filter – Adds beneficial minerals and balances pH for better taste and health.
-
-
NSF Certified Components
-
Steel Pressurized Storage Tank (typically 3.2 gallons capacity)
-
European-Style Chrome Faucet
-
Pressure Gauge for System Monitoring
-
Automatic Shut-Off Valve
-
Leak Detector Sensor Included
-
Color-Coded Tubing for Easy Installation
Specifications
Specifications
-
Water Pressure: 40–100 PSI
-
Membrane Capacity: 50–75 GPD (Gallons per Day)
-
Tank Capacity: 3.2 gallons (pressurized)
-
Operating Temperature: 5–45°C
-
System Dimensions: Approx. 43cm (H) x 38cm (W) x 15cm (D)
-
Faucet Material: Chrome-Plated Brass (European Style)
-
Installation Location: Under Sink
Included Components
Included Components
- 5-Stage Filter Assembly Unit with Pressure Gauge
- Reverse Osmosis Membrane (sealed)
- Alkaline Filter Cartridge
- Steel Tank
- Chrome Filter Tap
- Leak Detector Kit
-
Color-coded Tubing: Red (inlet), Blue (RO output), Black (drain), White (tank)
Certifications
Certifications
-
Watermarked certified
-
NSF/ANSI Certified Membrane and Components
-
BPA-Free Materials
-
Made in Taiwan – Quality Manufacturing Standards
Pure4Sure RO-5ALK Installation Instructions
Pure4Sure RO-5ALK Installation Instructions
Overview
The Pure4Sure Watermarked RO-5ALK is a 5-stage, high-efficiency Reverse Osmosis (RO) drinking water system designed to install neatly under your kitchen sink. The system delivers ultra-pure, mineral-balanced, alkaline drinking water directly to your chrome tap.
This guide provides step-by-step instructions for professional-quality installation and setup.
1. Components Checklist
Before beginning, ensure all components are included:
-
5-Stage Filter Assembly Unit (with pressure gauge pre-mounted)
-
RO Membrane (sealed pack)
-
Alkaline Filter Cartridge
-
Steel Storage Tank (3.2 gal, pressurized)
-
Chrome Faucet (European style)
-
Feed Water Valve Adapter (½” or ⅜” fitting)
-
Drain Saddle Clamp
-
Leak Detector Kit
-
Color-coded Tubing
-
Red → Feed Water
-
Blue → Pure Water Outlet
-
Black → Waste Water (Drain)
-
White → Tank Line
-
Filter Housing Wrenches (1x filter, 1x membrane)
-
Mounting Screws (if wall-mounting)
2. Tools Required
- Adjustable wrench or spanner
- Drill with ¼” (6 mm) bit (for faucet hole, if required)
- Phillips screwdriver
- Utility knife or tubing cutter
- Teflon tape
- Bucket or towel
3. Installation Steps
Step 1: Choose Installation Location
-
Select a clean, flat surface under the kitchen sink.
-
Ensure there’s enough space for:
-
The main filter unit (≈ 43 cm H × 38 cm W × 15 cm D)
-
The storage tank (may sit beside or behind the unit)
-
Allow easy access for filter replacement.
Step 2: Install the Drinking Water Faucet
- If your sink has a spare hole (e.g., for a soap dispenser), use it. Otherwise, drill a ¼” (6 mm) hole in a convenient location.
- Place the faucet base, rubber washer, and decorative ring.
- Insert faucet stem through the hole.
- From below, tighten with the provided washer and nut.
- Connect blue tubing to the faucet base (push-fit fitting).
Step 3: Connect the Feed Water Valve
-
Turn off the cold-water supply under the sink.
-
Disconnect the existing cold-water line from the stop valve.
-
Attach the feed-water adapter valve between the stop valve and the cold-water line.
-
Wrap threads with Teflon tape to ensure a tight seal.
-
Connect the red tubing from the adapter valve to the inlet port of the RO unit (marked “IN”).
Step 4: Connect the Drain Saddle
-
Select a spot on the sink drainpipe (preferably the vertical section above the P-trap).
-
Drill a ¼” hole through one wall of the pipe.
-
Align the drain saddle clamp so that its hole matches the drilled hole.
-
Secure both halves with the provided screws.
-
Insert the black tubing into the saddle’s quick-connect fitting.
-
This is the RO waste (reject) water line.
-
Step 5: Install the RO Membrane
- Unscrew the membrane housing cap using the wrench.
- Remove any packing material.
- Insert the membrane into the housing — rubber O-ring end first into the cap side.
- Push firmly until fully seated.
- Replace and tighten the housing cap securely.
Step 6: Connect the Storage Tank
-
Wrap the tank outlet threads with Teflon tape.
-
Screw the tank ball valve onto the outlet.
-
Connect white tubing from the valve to the tank port on the RO unit (usually marked “TANK”).
-
Ensure valve handle is closed (perpendicular) during initial setup.
Step 7: Connect the Alkaline Filter
-
Identify the output line from the post-carbon filter.
-
Connect this to the inlet of the alkaline filter.
-
Connect the outlet of the alkaline filter to the blue tubing that leads to the faucet.
-
Use the flow direction arrows printed on the cartridge for guidance.
Step 8: Leak Detector Setup
- Place the leak detector sensor pad under the RO unit.
- Follow included instructions to connect the sensor cable to the system (battery-operated).
- This will automatically stop the feed water in case of a leak.
- Start-Up Procedure
-
Turn on the feed water valve slowly to allow water into the system.
-
Check all connections for leaks — tighten fittings as needed.
-
Keep the faucet open for 5–10 minutes to allow air to purge.
-
Close faucet and let system fill the tank (approx. 2–3 hours).
-
Once full, drain the entire tank completely to flush any residual carbon fines.
-
Refill tank — system is now ready for use.
-
- System Monitoring
-
The pressure gauge should show between 40–100 PSI during operation.
-
If pressure is too low:
-
Check water supply.
-
Ensure membrane is not clogged.
-
If pressure is too high:
-
Verify the automatic shut-off valve is functioning correctly.
-
Step 8: Maintenance Schedule
| Component | Replacement Interval | Purpose |
|---|---|---|
| Sediment Filter | Every 6–9 months | Removes dirt/rust |
| GAC Carbon Filter | Every 6–9 months | Removes chlorine & odour |
| RO Membrane | Every 18–24 months | Removes dissolved contaminants |
| Post-Carbon Filter | Every 12 months | Polishes taste |
| Alkaline Filter | Every 12 months | Adds minerals & pH balance |
Always use Pure4Sure genuine filters for optimal performance and warranty protection.
Step 9: Safety and Tips
-
Do not connect to hot water (max 45 °C).
-
Ensure incoming pressure stays within 40–100 PSI.
-
Install on cold-water line only.
-
Flush filters before first use and after long periods of non-use.
-
Replace filters on schedule to prevent bacterial growth.
-
For best taste and purity, drain and refill tank every few days if unused.
Step 10: Post-Installation Checks
-
All tubing connections secure, no leaks.
-
Faucet delivering clean, steady flow.
-
Pressure gauge within range.
-
Leak detector functional.
-
Tank filling and shutting off automatically.
Made in Taiwan — Watermarked Quality
Made in Taiwan — Watermarked Quality
All components are WaterMark & NSF/ANSI certified, manufactured to the highest standards using BPA-free materials for long-term safety and reliability.


